These are my notes on creating nice residential concrete floors. In my primary residence, I put in about 1500 sq-ft of concrete floors in the lower level. I used a 6-inch slab on crushed stone with 1/2 inch PEX tubing for hydronic heating. I’m pretty happy with these floors, although not wild about the results I got in finishing/sealing them. I am in the process of building a second home in which all three levels will have concrete floors. In principle concrete is (a) very inexpensive, (b) a wonderful means of installing hydronic heating, and (c) attractive. But, I’ve found that there is all kinds of confusing information about how to achieve these aims. Here is what I’ve learned based on experience, research, talking to concrete contractors, and my own experiments.
Formulation
Concrete is formed by mixing water, portland cement, sand, and gravel. A chemical reaction occurs between the cement and the water that results in a rock-like material with very high compressive strength. This material ends up in a mixture with sand and gravel, which forms a very strong, very inexpensive composite material. How strong? It depends on the mix, but typically several thousand pounds per square inch compressive strength. In flooring applications, concrete is almost always reinforced with either wire mesh or rebar, which theoretically provides tensile strength as well. Concrete gets stronger with age…for decades. Old concrete is super strong stuff. (The corollary is that if you want to cut or drill concrete, do it when it is young.)
There is something called “lightweight concrete” which entrains air in the mix. It’s not that light. It also has risks of delamination of the top layer if steel troweled. I wouldn’t bother.
Cost
Concrete is an inexpensive raw material. It is sold in units of a cubic yard (usually just called a “yard”). A yard is a lot of concrete. (A typical concrete truck holds 5-10 cubic yards.) By definition, a yard of concrete is 3ft x 3ft x 3ft = 27 cu-ft. So, a yard of concrete is equivalent to these floor areas:
54 sq-ft 6 inches thick
65 sq-ft 5 inches thick
81 sq-ft 4 inches thick
108 sq-ft 3 inches thick
162 sq-ft 2 inches thick
If your floor is 1000 sq-ft and 3 inches thick, you’ll therefore need 1000/108=9.25 yards of concrete.
The material itself costs about $100-$130/yard depending on local conditions. This is the price for a truck to deliver several yards to the site. Let’s assume $130/yard. At that price, the raw material for your 1000 sq-ft floor is going to run about $1200, or $1.20/sq-ft.
The cost to “place” the concrete is about $1.00-1.50/sq-ft for interior floors. (It’s about a third less for driveways, walks, etc.) This includes getting the concrete from the truck to the floor, leveling it, and steel troweling it to form a smooth surface (done several hours after the initial “pour”).
You’ll also pay about $750-1500 (lump sum) for a pump truck if your concrete can not be delivered through a chute from the back of the truck, as will be the case for most upper floors. The pump truck literally pumps the concrete through a large hose to the floor location.
Finally, you’ll pay for the rebar or wire mesh that reinforces the floor. This will cost another $0.25-0.50/sq-ft depending on how much reinforcement there is.
So, to get a smooth freshly poured concrete floor in place will cost about $2.00/sq-ft plus the cost of the material and the cost of the pump truck. All in, a 1000 sq-ft lower level floor with a 5inch slab will cost about $5000. That same area with a 3 inch slab (say on an upper level) will cost about $4000. (Both scenarios include $1000 for pumping.) This does not include placing any crushed stone under the slab, installing a vapor barrier, or installing insulation, as you will probably do for lower-level slabs. It also does not include placing in the slab any plastic tubing for hydronic heating, which you’ll want to do if you live in a climate requiring heat.
These prices are for Park City, Utah, a resort community outside of Salt Lake City. Prices are similar where I live outside of Philadelphia. Prices may be lower in some rural locations. They’ll be a lot higher in Manhattan.
On a lower level which will have a slab poured anyway, a finished concrete floor is the cheapest floor you can do. On an upper level, there are less expensive options. Specifically, you can install decent carpet for less money, especially when you consider that the floor framing (e.g., floor joists) will be somewhat more expensive because of the extra weight of a concrete floor. However, if you are certain you will use hydronic (i.e., “radiant”) heating in your floors, then there is no less expensive option than concrete. (This is because the alternative ways to get plastic tubing under floors for hydronic heating are all about as expensive as just putting in a concrete floor.) Cost can be a primarily motivation, but honestly, I just like the look and feel of warm gray concrete. It looks great with colorful rugs. It is a nice neutral background for almost any decorating style. It is really low maintenance to boot. It feels very nice in bare feet during heating season.
Reinforcement
Some argue that rebar and wire mesh are equally effective in reinforcing concrete if properly installed (e.g., Fine Homebuilding article “Rebar vs. Welded-Wire Mesh,” 2009). However, one respected contractor declared to me “wire mesh does nothing.” I’ve demolished a few concrete floors for other projects, and have found the mesh at the bottom of the slab, nowhere near the center of the slab where it belongs. My opinion is that either mesh or rebar can work as reinforcement, but that wire mesh is more easily installed incorrectly, and so rebar is the safer method. I also believe that in most upper-floor residential slab applications, it pretty much doesn’t even matter if the concrete is reinforced. Generally, the structural engineer does not assume any strength or stiffness from the concrete floor…it’s basically just a layer of concrete sitting on the subfloor. In my opinion, cracks will form no matter what you do…so that isn’t the issue. So, in sum, I would use rebar for slab-on-grade (e.g., the basement floor) and use whatever the contractor wants to use for the upper floors.
Slab thickness
In lower levels (e.g., basements) your slab will typically be 4 inchs to 6 inches thick. Mine will be 5 inches thick just because that’s the minimum my “flat work” contractor recommends.
When you use concrete in an upper level you have to support it with the floor structure. It’s heavy, about 40 lbs/sq-ft for a 3 inch slab. So, you can’t generally make it 5 inches thick. Probably the thinnest feasible slab is 1.5 inches. Probably the thickest you would make it is 3 inches thick due to weight considerations. My brother, who is also an obsessive engineer, has determined that 2.25 inches is perfect. My architects argue that 3 inches is the right thickness to minimize cracking. (I doubt anyone has studied cracking as function of slab thickness in any controlled way, and I personally doubt it matters much on that dimension.) I’m going with 3 inches based on the preferences of the architect, the contractor, and to be absolutely sure I’ve got plenty of coverage over the heating tubing.
You also need to think about what happens at the edges of the floor. In general, you pour the floor after the walls have been framed, but before the drywall has been installed. You pour it right over the sub-floor, usually oriented strand board (OSB) or plywood. In most cases you need to add additional layers to the “plate” (the “2-by” lumber that supports your walls). This is because you need something to attach the bottom of the dry wall to after you pour the floor. So the wall plate has to stick up above the concrete at least an inch or so. So, if your slab is 1.5 inches thick, you’ll double the wall plate (two layers of 2x4s or 2x6s…you know 2x4s are just 1.5inches thick, right?) so that the concrete comes up to the level of the first 2×4 and the dry wall and baseboard can be fastened to the second one. In my case, since I’m using a 3 inch slab, I’m going to use a triple plate; i.e., there will be three layers of 2x4s at the bottom of the walls. The slab will cover the first two, and the top one will be the nailer for the baseboard and dry wall. Note that the wall plate is super cheap…don’t worry about that.
Protecting the Surface
In most residential construction, a concrete floor will be covered by carpet, tile, or wood. Thus, the trades usually make a mess of the floors without any concerns. Paint will splatter, drywall mud will cake surfaces, there will be chips and dings from dropped objects, etc. This is all bad if the concrete will be the finished floor. I spent a couple of days scraping and scrubbing with a scotchbrite pad on my first floor, and thus learned my lesson the hard way. You should protect the floor shortly after it is poured with Ramboard or Masonite. I’m going to try Ramboard, which seems like a nice material for this purpose. It is plastic laminated to a thin hardboard and it comes on a roll. You cut and tape it to fit the entire floor area. I’ll leave it down for the entire construction project after the floors are poured.
Insulation/Vapor Barrier
On a lower level (e.g., basement or garage) you need to insulate the slab. Theoretically you only need to insulate the edges of the slab. I believe code requires something like R10 for four feet in from the edge. The reason you only need to insulate the edges is that once you have warmed up the earth under your house to a depth of about 12 feet or so you won’t lose any more heat to the ground in the straight down direction. You will continue to lose it out the edges and to the sides if you don’t insulate the edges. This is a big deal, arguably the most important few hundred dollars you’ll spend on your project.
Do not believe a heating contractor who tells you that a reflective insulating blanket is all you need. That blanket is pretty much a waste of your money. I’m not going to go into the details other than to say that there is no radiant heat transfer in a system with no air gap. Thus, there is absolutely no reason to embed a layer of reflective foil between the crushed stone and concrete on a lower-level slab. Having said that, the stuff is a good vapor barrier, which you do need. But, you can buy vapor barrier much less expensively than the reflective/quilted blanket product.
Despite what you might imagine intuitively, concrete is a terrible vapor barrier. Water vapor passes right through it. So, you absolutely must have a great vapor barrier under your lower-level slab (not an issue for upper levels). This means some kind fo thick poly film. There are several vapor barrier products ranging from just thick polyethylene to woven/laminated polyesters. I don’t think the specifics matter much as long as the barrier is continuous. (This means any tears, voids, gaps, etc. should be taped up before the pour.)
Many people argue that you should insulate the floor joists below your heated slab on an upper floor. They argue that this ensures the heat will go “up” not down. They also argue that this allows you to maintain better temperature control between floors. I really don’t buy either argument. I believe the heat transfer between a bare concrete floor and the air above it is dramatically better than between that slab and the room below…that path requires conduction through the sub-floor, convection through the air space in the floor joist cavity, conduction across the cieling material, and then convection downward to the room. I’m just not convinced you’ll get very much heat transfer in the downward direction. Of course if the lower space is unheated, you should definitely insulate. But, if you are just trying to thermally separate two heated rooms, I doubt it matters much. (I could be convinced otherwise by evidence…but not by the lame reasoning I’ve heard so far.)
Heating
As I’ve already suggested, you pretty much want to use in-floor hydronic heating with concrete floors. In most cases, you’ll want to use 1/2 inch PEX tubing. There are a lot of internet resources for how to do this. I won’t repeat them here.

Achieving Desired Color
The natural color of most concrete is light gray. This is because most portland cement is very gray, and most gravel and sand is gray enough that the color of the cement dominates. Portland cement can also be white, which may be used in special applications like countertops. In some parts of the world the sand is a distinctive color like red or black, in which case the concrete takes on the hue of the sand. Most of the time your concrete will be light gray naturally.
There are a bunch of ways to get a color other than gray. First, the obvious. You can paint it. This is very common in industrial plants, and is a common approach to garage floors. Paint is a simple technology, is inexpensive, and can achieve pretty much any color you want. It’s main disadvantage is that without expensive faux-painting techniques you’ll end up with a very uniform color, which is not very interesting visually. You’ll also need to repaint periodically when the paint wears through (which it will do). Still this is a pretty good option, particularly for an old concrete floor, where you need to clean up some surface defects. (Incidentally, most concrete “sealers” are just acrylic or epoxy paints with no pigment added…so you are probably going to be painting your floor anyway if you apply a sealer.)
Acid stains are applied to bare concrete. Metal salts in the stains react with the surface to leave a color on the surface. For example, the copper-based stains are greenish, the iron-based stains reddish, etc. The nice thing about the acid stains is that they look fairly natural. The colors are mostly muted, the distribution of color is mottled, and the patterns are soft. The disadvantage is that the color palette is quite limited (greenish, brownish, yellowish). In the Church House project, I experimented with a bunch of acid stain options under my stair on a surface that would be hidden in the finished house. I liked the effect, but I really wanted more of a gray than a brown/yellow. You can’t get a dark gray with the acid stains. If you are interested in the brownish/yellowish colors, then by all means experiment with the acid stains. They are easy to use and the colors are quite integral to the top surface of the concrete.
Dye-based stains are simply applied to color the surface. These are available in pretty much any tone.
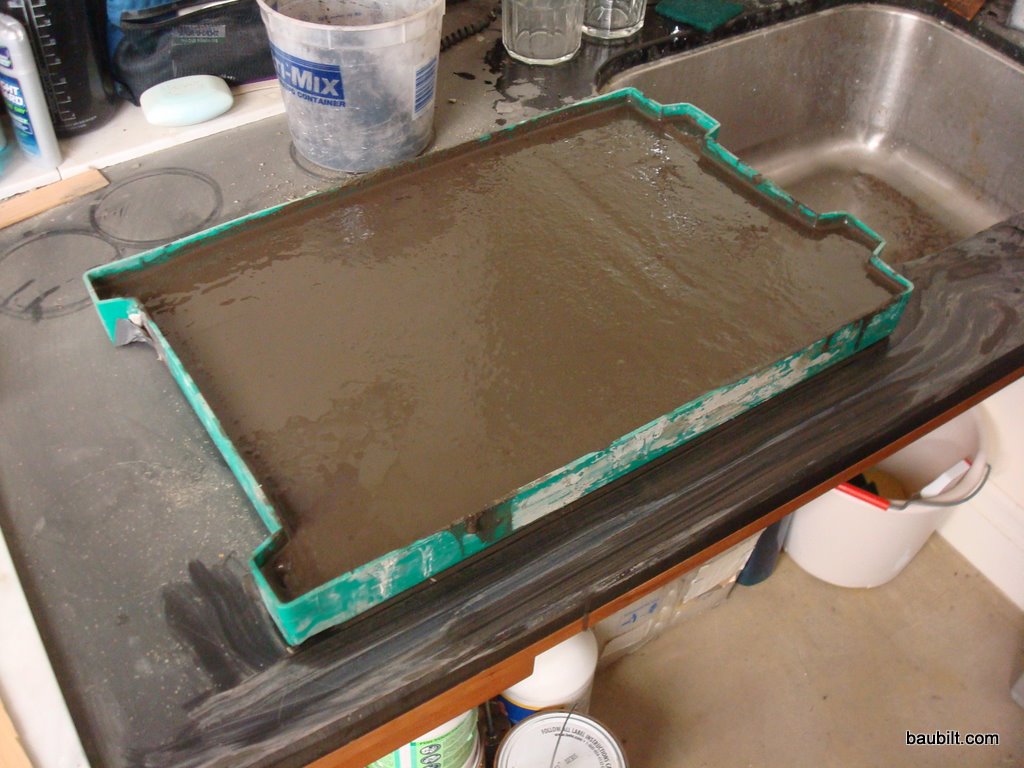
You can also “color the mud” directly. To get a nice dark natural-looking gray, I like 10-15 lbs carbon-black pigment per cubic yard of concrete. The pigment I experimented with is the “230 Pigment” from Direct Colors, Inc. There are lots of colors available (e.g., orange, blue, etc.) so you can get pretty much whatever you’d like. Of course in most cases you are starting with a gray material and so getting a light pink or something is unlikely. (In a small area, say for a hearth or countertop, you can use white portland cement, which lets you achieve light colors.) My plan for the Park City house is to color the mud with a carbon-black pigment. This is an affordable way to get a nice dark gray that is integral to the material.
No matter how you color the concrete, you still need to seal it.
Finishing/Sealing
There is a lot of mysticism around sealers. I’ve come to conclude that the best overall approach is a simple clear acrylic sealer. Basically, you are painting the floor with a clear acrylic paint. Acrylic sealers are mostly water born coatings and they are available in lots of different sheens (e.g., satin, semi-gloss, gloss) They come in lots of different solids ratios (what fraction of the mix is the acrylic polymer versus the water). The acrylic sealers that come in “jugs” are really just low-solids mixes. Those that come in “paint cans” are higher solids mixes. Your goal is to get a nice uniform layer of the acrylic onto the surface. The advantage of the lower-solids formulations is that they dry a bit more slowly (more water to evaporate) and are less viscous. As a result, you may be able to apply them more uniformly and they may flow into the cracks and interstices more readily. I have found that if you are trying to coat a warm concrete floor in a low-humidity environment, the coating dries almost immediately on contact, which can be a challenge.
One caveat with acrylic coatings. Fresh concrete is highly alkaline (high pH) and some acrylics don’t like highly alkaline surfaces. On my first try, the coating literally disintegrated into granules after drying. I ended up sweeping and vacuuming the granules and starting over. I first sprayed the floor with diluted muriatic acid (resulting in fizzing) and then washed the floor with a mop. After that treatment, the coating adhered very well. I don’t think this is a problem for all acrylic formulations, but I haven’t tried them all. It’s hard to believe that a clear acrylic sealer intended for concrete (e.g., Behr clear garage floor paint) has this problem, although they do warn that the concrete must be at least 30 days old before applying the sealer.
I have been very happy with the Behr products (sold through Home Depot). They do very well in the Consumer Reports tests and they are good values. There are three products I’ve used: Behr Wet Look Sealer (in a jug); Behr concrete primer (in a paint can); and Behr garage floor paint (in a paint can). As best I can tell, all are basically water-born acrylics. I have not tested the primer to know whether it is necessary or valuable. Most primers are just thin versions of the top coat. The prices are similar, so there is probably no harm in using the primer as the first coat.
I’ve also experimented with oil finishes. I’ve tried tung oil finishes (including Danco and Sutherland and Welles formulations). Honestly, I wouldn’t use these. They are slow to dry, smell bad, and are expensive. Elsewhere, in my post on interior wood finishes, I discuss the extent to which these are really “green.” I also found that they did not resist water as well as the acrylics. If you use a satin acrylic you are going to get a very similar look to an oil finish, but with much less fuss. I believe it is a myth that oil finishes penetrate better. They are just a coating like any other coating. The oil polymerizes in the presence of air, resulting in a layer of “plastic” just like with an acrylic finish.
I’ve also used water-based polyurethane coatings (e.g., Minwax water-based polyurethane wood finish). I was not happy with the results. I have had peeling problems with those floors. I have not tried more conventional oil-based polyurethane floor finishes on concrete. I would expect them to be a bit more durable than acrylics. However, acrylics are so standard in floor coatings, and so easy to apply and re-apply, that I lean towards that approach. (I have a different opinion for wood, where I believe the effect on the appearance of the grain is better for polyurethanes.)
Epoxy coatings have become popular for garage floors. Most true epoxies are thermosetting polymers, meaning they are mixtures of two compounds, which react to form a hard polymer. These can be applied in thick layers and are extremely tough. They are also expensive and a bit tricky to apply. I’ve not used them myself. I believe the clear epoxy coatings are what you see in many Whole Foods supermarket floors, usually applied over acid stained surfaces.
There are mysterious “tile and stone sealers” sold in jugs for application to tile. The one I tried is 4 Care brand (TileLab) tile and grout sealer. It looks and smells like water. (I didn’t taste it.) I tested it on concrete and on a marble tile. Water doesn’t bead, it doesn’t seem to resist staining. It doesn’t change the appearance. The MSDS lists as the active ingredient perfluoroalkyl methacrylic copolymer in the range of 1-5% total weight. (So it basically is water.) That compound is a water-repelling material used on fabrics and other surfaces, but there isn’t much of it in that jug and it doesn’t seem to do anything when applied to concrete. Maybe there are tile and grout sealers that actually do something, but this particular product does not seem an appropriate sealer for concrete floors.
Finally, there are a whole class of penetrating concrete sealers called silicates. (There are lots more mysterious sealers like silicones, siliconates, and silanes…from what I can discern, the best for smooth floors are the silicates.) These are very low viscosity liquids that penetrate the concrete and react with the CaOH in the material. This results in a permanent integral seal. The reaction can go as deep as several inches. It apparently increases hardness and resistance to liquids. The silicates do not, however, impart any sheen to the surface. I do not know the extent to which they resist dusting, either. I believe that a polished concrete floor (e.g., a Home Depot floor) is first treated with a silicate before polishing with a diamond pad, which gives it some sheen. Conventional acrylic coatings adhere over silicates, so one approach might be to first apply a silicate and then apply an acrylic coating. I’ve not tried this, and my sense is that it is overkill for a residential floor.
Experimenting
If you are really into this stuff, and enjoy experimenting, I recommend you buy a couple of bags of premixed dry concrete at Home Depot (about $6-7…but really heavy… 60-80 lbs.) and play around a bit. I made a mold by slicing off the bottom of a plastic bin roughly 19in x 14in x 2in. I used that mold to make big concrete tiles. You can mix the concrete right in the mold, trowel the surface smooth, let it sit for a couple of days and pop it out of the mold. You can then play around with finishes on the bottom surface, which should be really smooth from the plastic on the mold. I used this method to test different concentrations of pigment and to test different sealers.
I made a bunch of tiles to try different sealing methods and different coloring techniques.


i’m about to build a barn live/work space in stamford, vt. great site! great info, thanks!
LikeLike
Good information, but I have another issue/question not mentioned here: control joints, and do I have to leave them open?
Our control joints are almost 1/4″ wide and at least 3/8″ deep. They collect dirt & dust, so require frequent vacuuming when I would prefer to just sweep my floor most of the time.
I don’t want to use toxic, high VOC products inappropriate for interior residential use, and ost advice on the web discusses structural concerns from heavy commercial/industrial use. It does not seem helpful.
I just put sanded grout for tile into the joints in one room against most advice. I don’t want to do the whole house if the grout will soon crumble and self-destruct.
Any ideas?
LikeLike
Honestly, I don’t love the control joints either. I agree that they collect dust/dirt and it would be nice not to have the grooves in the floor. I’ll be very interested to hear how the grout works. In principle the concrete is supposed to crack along the control joints. It’s hard to tell if that in fact happens. I wonder if grout will allow the slabs to move relative to each other or not. I was thinking of using a tinted silicon caulk on the joints. I bet they would almost disappear. An alternative would be some kind of polymer filler (e.g., a urethane or epoxy). I may try one room and see how I like it.
LikeLike
Karl… Did the Ramboard work well to protect the floor?
LikeLike
Yes, the Ramboard worked quite well. However, it is fairly expensive. (I only used it on the lower level, where the concrete was placed right at the beginning of the job. Upstairs I used poly sheet before drywalling.) Still, next time I would hire someone to do a careful job of floor protection right after any concrete was placed. I’d probably use Ramboard again. I’d probably still put down poly before the drywall was hung. Dryway makes a mess of the floors. It is so painful to have to scrape and scrub at the end of the job, before applying floor sealer. You don’t notice all the drips and marks during construction, but they all have to be cleaned off at the end. I was not careful enough about the floors in the final stages (finish carpentry and painting). None of the guys (except possibly the painters) are very careful about floors, so you really do have to protect them.
LikeLike
We are in escrow for a house that was built in 1962 and has never been touched. The kitchen has a thin carpet with concrete underneath. We are really on a tight budget so I am thinking of getting rid of the ugly carpet and polishing up the concrete. Would we still need to add concrete on top of what is already there or can we just stain it? Not sure if the instructions you are providing are for a house that is already built or for new construction. Thanks!
LikeLike
The nice thing about this situation is that you can try something and if it doesn’t work you can consider alternatives. It will be very inexpensive to try a few things. I think the main question is the condition of the concrete under the carpet. In an ideal world there would be no adhesive and it would be perfectly smooth. In that case, you could just clean up the concrete, apply a sealer and call it done. You’re going to want to pull up that carpet anyway, so I’d start by doing that and then assess what you have. Polishing the entire surface is fairly expensive and I’m not sure it is a good DIY project. However, if you have a smooth existing surface, you can just apply a glossy, clear sealer and it will have a “polished” look. (I’ve used the Behr wet-look concrete sealer from Home Depot and have been quite happy with it. It is a well mannered acrylic sealer, easily applied and quick drying.) If you have some bad spots, you can certainly try to patch them with a mortar mix. I have had pretty good luck grinding and polishing small sections of floor with an angle grinder and diamond pads. One of my posts describes this.
Also, the concrete acid stains are not hard to use, if you really don’t want a plain gray floor. There are some pretty nice brown/rust colored options. A tough epoxy floor paint would also work, and is probably the cheapest thing you can do. That’s a standard approach to factory floors and can be pretty neutral.
Finally, you could consider one of the linoleum products (e.g., Marmoleum) if you want something more colorful or softer than concrete. However, those aren’t super cheap. (If you are on an extremely tight budget, you could put down one of the laminate “wood grain” products like Pergo. I don’t like fake wood grain as a matter of principle, but it is undoubtedly practical and inexpensive and I have to admit it looks pretty decent.)
LikeLike
Thanks for sharing your experience!
Our construction project (new construction) will be staring in a a couple of months. It will be a two-story with a full basement, with all levels having concrete floors and hydronic heating.
We were originally looking at polishing at a cost of $7/sq.ft., but for budget reasons, we’re considering a simple sealant. It’s useful to hear about your experiences with acrylic.
What has been your experience with reapplication intervals with the acrylic sealants?
LikeLike
Reapplication depends entirely on the level of use. The area under my rolling office chair in the Church House needs to be resealed every year or two. I suspect that most of the floor area in the Park City house will not need resealing for 10 years, given that it is used relatively lightly.
LikeLike
Hi. I just had a polished lightweight concrete floor poured in my loft and it is full of 1/4-1/2 inch round white spots. I was told that the pumice aggregate may have sucked the water and caused the look. Have you ever heard of such problem? Appreciate any info as I can seem to find a solution. Thank you.
LikeLike
Hi Marco,
I don’t have any experience with lightweight concrete, so can’t help here. Good luck with it.
LikeLike
Hello, we built a home 7 years ago and had help from a family member who has stained several houses, including his own. He helped us do our kitchen, living room, dining, utility, hall and 2 bathrooms downstairs. We purchased our products at a concrete staining store and took their advice on what to use. After about 6 months we noticed some white areas forming on the floor mostly where there wasn’t much traffic. I looked closely and scratched at it a little with a fingernail. The stuff chipped off so I assumed it was the poly sealer bubbling up. We also noticed a lot of fine white dust accumulating in our house that didn’t seem normal. The floor looks a little like it does when you leave a glass on a wooden table and the sealer crumbles up. Is there anything I can do to remove the crusty stuff and then what shoule I use to reseal the floor. We did put some of the gritty stuff they recommended at the concrete store on the floor also. Any suggestions?
Thanks, Susy
LikeLike
Unfortunately I don’t have any good ideas about this phenomenon. Sorry and good luck.
LikeLike
I live in a small town about an hour from Mpls. I can’t seem to find a concrete contractor that knows anything about pouring a finished floor over radiant heat on the second level. The guy that did the basement made a complete mess of it. My garage floor looks better. Everyone here tells me I have to pour gypcrete than do a thin concrete layer over that. This seems ridiculous to me. I want the cool smooth contemporary look of a concrete floor. The house is new and built to carry the weight. Do you have any suggestions on how to find someone who knows what they are doing? Thanks for your post it is the first info I have found on this subject.
LikeLike
It is really simple to pour a slab on an upper floor if the house has been engineered for the weight. Usually you need at least 2″ of thickness, although most people do 3″. If possible you want to put down regular concrete (not “lightweight” concrete). You certainly don’t want gypcrete, unless you plan to put down wood floors or carpet. We used a double bottom plate on the stud walls so that there was a 3″ high ‘form” all the way around the perimeter of the floor. (The framers put another piece of blocking between each stud to nail the drywall to after the floor was poured.) The heating contractor staples the tubing down for the heat. Then rebar or wire mesh is laid over the tubing. Finally, the concrete is poured. Anyone who can pour a commercial concrete floor with a steel troweled surface can do this. You should try some other contractors, because this is just not very hard for a good flatwork guy.
LikeLike
do you have to reseal it few times a year?
LikeLike
Definitely not that frequently. Our Park CIty house is a second home, but we have not had to touch the floors for two years. In the Church House, I only had to reseal one high-wear area of my shop after five years. Anyway, adding another coat of acrylic sealer is easy, and only need be done where the coating has worn away.
LikeLike
I’m moving into a condo with concrete floors, currently covered with shag carpet that smells of cigarette smoke. Want to remove the carpet and finish up the concrete. From this thread it sounds a little more delicate than I expected, however. Especially the mention of retouching the coating… Every 2 years (even every 5) seems very frequent to me — removing the furniture for the job etc. Could you elaborate a little? I’ll be the only person living in the space and would have area rugs in places.
Also, do you have to be careful using a vacuum cleaner on the floors? Anything to avoid? Would the beater brushes cause damage or excessive wear?
LikeLike
I think a coated and sealed concrete floor should last about like a wood floor finished with similar sealers, maybe even better. So, in low traffic areas this could mean never touching for 10-20 years. However, if you run an office chair with hard casters on the floor, you’ll need to retouch the area under that chair every couple of years.
LikeLike
The reviews on the Behr Wet look sealer are disheartening… They say it doesn’t work. Does it really have a wet look and what trick is there to using it?
LikeLike
It is definitely not a “wet look” on my concrete floors. But, it goes on easy, has worn well for me, and dries fast. I have no complaints about it. I would characterize it as having a slight sheen, but definitely not a gloss.
LikeLike
We used the Behr Semi-Transperant Stain from Home Depot and then applied the Wet Look Sealer. It went on easy, was streaky then dried quick. Not real wet looking at all. Next we wanted to paint the walls…we waited for the floors to dry completely then put down some paper with painter’s tape. Finished painting and took up the paper and tape off of the floor. The semi-transparent stain and sealer came up with the painter’s tape? We were so upset that the floor now had strips of no stain and sealer. Went back and sponged some color in but it never look right over the sealer? Going to try and reseal the whole floor again with another jug of Behr Wet Look Sealer? Any other suggestions?
LikeLike
Hello. I found your site when searching for photos of concrete floors in mid century homes. I like the combination of the wood floor board with the concrete- it makes it warm. What material is it and it looks like it’s only in some areas. Thank you!
LikeLike
I think the only wood we have on the “floors” is the landings on the stairs. In one case that landing is clear, vertical-grain fir. In the other case, the landing is actually architectural glulam beams laid on their sides. Everything else is plain old tinted concrete with a clear acrylic sealer. We use a lot of area rugs for warmth and color.
LikeLike
Hello, I am building a new home Pennsylvania. The first floor is concrete with radiant heat. The contractors poured the concrete (2 1/2″) about a month ago and it has been cracking. Also due to a poor quality finishing (footprints, discoloration & patches of rough surface), our GC decided to have a different contractor remove the finish & then refinish. The refinishing was not very successful…more cracks & now patches of aggregate showing. Can you recommend a solution? Are the contractors not using the proper mix for this depth? Your thoughts are appreciated. Thank you.
LikeLike
There are two kinds of concrete: (1) concrete that has cracked, and (2) concrete that will crack. All concrete cracks. The question is whether the cracking is excessive. In any case, you are more or less stuck with what you have, unless you are going to remove several tons of concrete with a jack hammer. So, you really should focus on surface finish. How bad is the surface? Is it spalling and chipping? If not, you can probably just clean it up and reseal and it will be fine. If you want a perfectly smooth surface, you could use a diamond polisher to create a pristine flat surface. That probably costs about $3/sq-ft, but looks really nice.
LikeLike
I love the floor in that image! Do you know if they were grinned/polished at all? Or was the concrete pour and sealer added? Thank you!
LikeLike
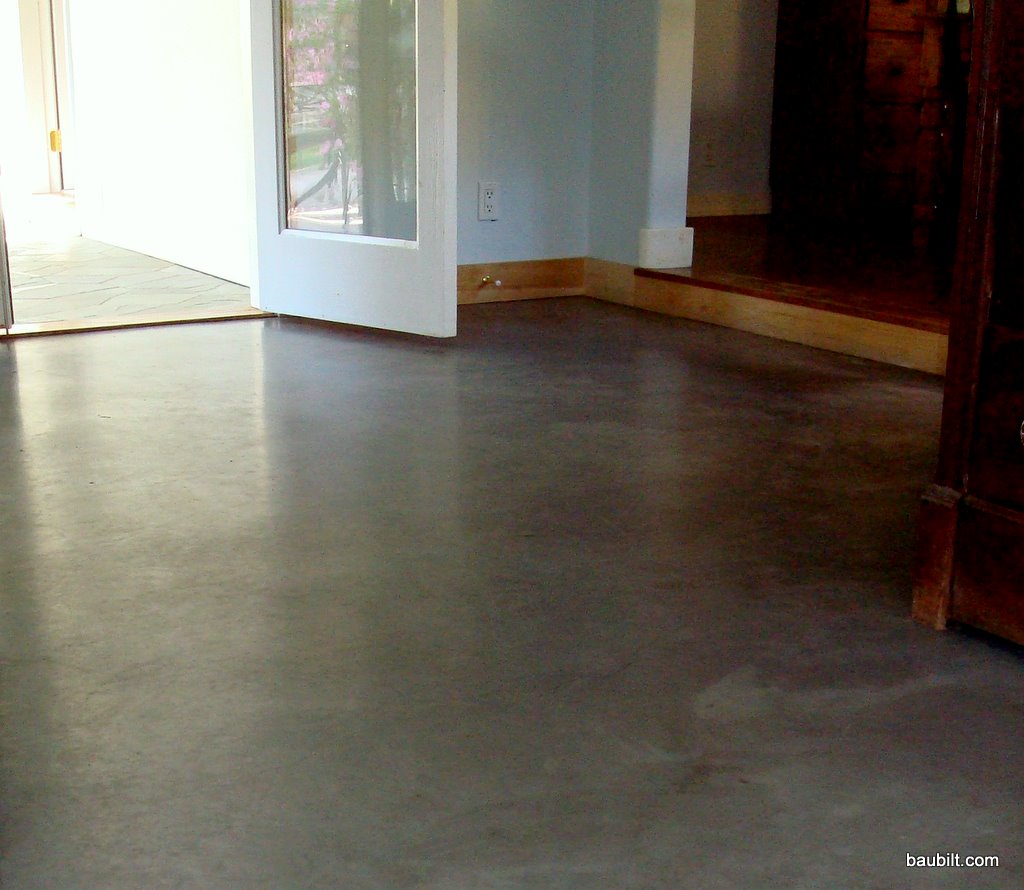
The floor is “as troweled” — there was no polishing or grinding.
Having said that, the lower level is very nice and smooth and the main level is a bit rougher. So, if doing it again, I would talk to the flat-work contractor about finishes and strive for the smoother finish. I may, in fact, grind and polish my kitchen floor because it’s not as smooth as I’d like.
LikeLike