Category Archives: Vermont Mini Cabin

Marmoleum “Click”

I chose Forbo Marmoleum for the mini cabin floor. I’ve used Marmoleum in two other projects– my church house kitchen (twice actually) and in a commercial project at work. I like the material quite a lot. Marmoleum is a trade name for  a type of linoleum, which is a composite sheet material made from sawdust, linseed oil, dyes, and a jute backing. It is very forgiving, durable, and comes in a lot of funky colors. The sheet version comes in a 2 meter wide roll, which is really the only weakness of that form, requiring seams for most applications. The material is very heavy, so I knew I couldn’t haul a roll down the trail. Fortunately, the material comes in tiles, which are roughly 1 ft. x 3 ft. This version is called Marmoleum Click, because the tiles are supposed to click together.

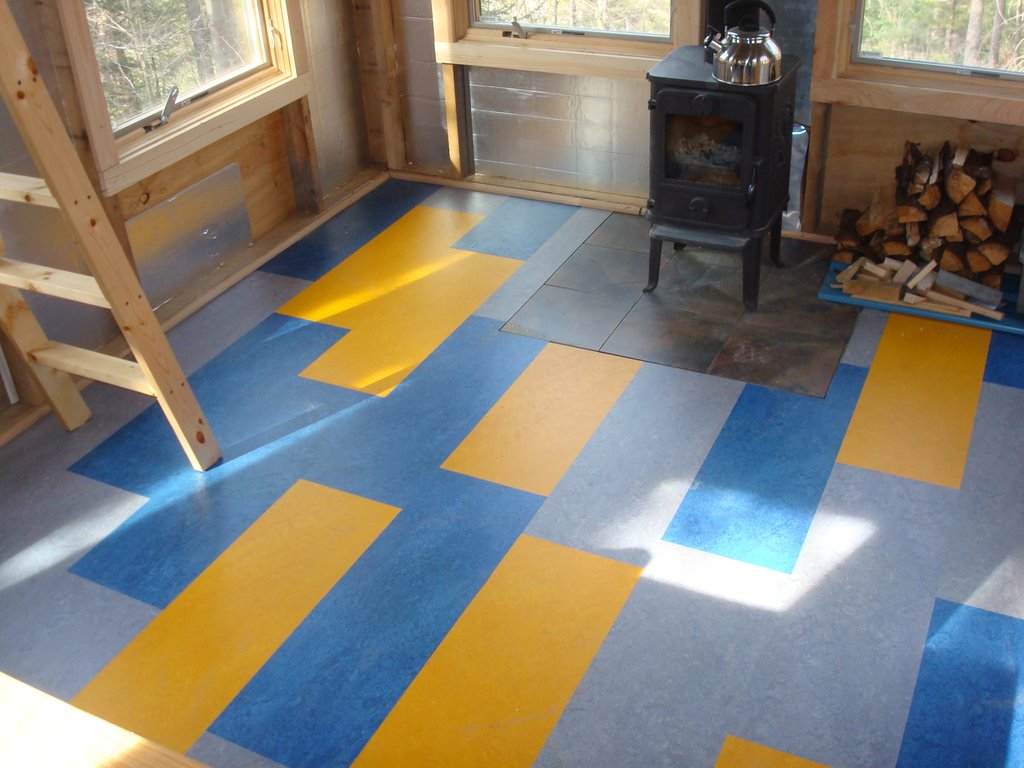
The click system comprises tiles which are about 3/8″ thick. The bulk material is basically a sawdust-polymer composite of some kind, with the colored surface making up the top layer. A fussy little profile is milled into the edges so that the tiles are supposed to click together. Except they don’t.

Continue reading

The Morso 1410 Woodstove

I had experimented with propane space heaters and concluded that I needed somewhere between 10,000 and 30,000 btu/hr of power to keep the Mini Cabin warm in the dead of winter, when temperatures drop below 0 F. (Specifically, I found I could maintain 30F temperature difference between inside and outside at 10,000 BTU/hour. BTW, for the non-US reader, 10,000 btu/hr is about 3 kw.) I also reasoned that I could always open an upper window if things got too toasty. Still, 30,000 BTU/hr is a very small wood stove. So, I went looking for the smallest nice woodstove on the market. I chose the Morso 1410.

Continue reading

Metal Roof

The mini cabin is topped with Fabral painted steel roofing panels. The lumber yard can order this type of roofing in custom colors (Hartford Green in my case). This is a robust, proven roofing solution, and is not very expensive. I’m quite happy with this choice.

My father and I ran purlins (rough-sawn 2x4s perpendicular to the rafters) at the eave, at the ridge, aligned with the side walls, and then spaced evenly (at about 22 inches on centers) from the ridge down. We then screwed the roofing down with 2-1/2 inch galvanized roofing screws with heads painted green to match the roofing. (Fabral sells these with the roofing.) We used a conventional drill/driver with a 1/4 inch hex drive to put these in. Next time I’ll use an impact driver. A few hundred screws are required even for a small roof like mine, and many are driven at odd angles. Your wrists will thank you if you use the impact driver. The link here is to the DeWalt unit I own, mostly because I’ve standardized on the 18V lithium battery pack for my tools and chargers.

Continue reading

Siding

I grew up in a house with gray vertical ship-lap pine siding. Maybe that’s why I chose that siding option for the shed. The siding is often called “rough-sawn pine” but it is actually planed smooth and then wire brushed to make it “uniformly rough” on one side. I pre-stained it on both sides with Behr premium siding stain. By “I” I suppose I mean that my father and mother and two kids stained the siding. This was definitely a task that benefited from a bunch of extra hands. They laid down some plastic sheet on the road and went to town. I remember we were listening to NPR while doing this. This was the morning John McCain announced Sarah Palin for Veep–thus the look on my mother’s face.

This siding is very easy to install. Just cut to length and cut any joints on a 45 degree miter. I ordered the siding from the local saw mill in 10′ lengths, which was longer than almost any vertical dimension on the building. I used 1-1/4″ ring-shanked stainless nails, which held the siding very well but did not protrude through the sheathing to the inside. (I know the nails are long enough because when I had to pry off a piece of siding to correct an error, the nails pulled through the siding…they hold very well in the plywood.) The only slightly tricky thing is getting the siding to come out evenly between windows. I tried to be clever and space the windows exactly an integral number of siding widths apart so that the siding would line up cleanly between windows. Those windows are really hard to locate perfectly, though…so I ended up ripping off 1/16″ from the width of every length of siding that would be installed between windows. (Note how there are exactly four boards between the gable-end windows.) The even layout looks pretty sharp, in my humble opinion, but my perfect plan did require some ad hoc fussing.

One other trick. Don’t try to get the siding to come out even on the bottom edge. Just let it hang a few inches long. Then, when you’re done with the job, snap a chalk line around the skirt and trim with the circular saw. That’s a very satisfying last step, and results in a sharp, clean edge.

Mini Cabins and Building Permits

Zoning and building permits are both good ideas. They keep Vermont pretty so New Yorkers can enjoy it. They also help ensure public health and safety. Worthy objectives.

The problem is that most zoning codes can’t distinguish a nice little cabin for relaxing in the woods from a vinyl-sided shack inhabited by a band of misfits running a meth lab. But while the literal interpretation of codes can sometimes prevent you from doing nice things, it can also allow you to do what you want if you play by those literal rules. My solution was to read the zoning code very carefully and to find a building classification that literally matched what I was building. My local code defines an “accessory building” in a way that includes my little cabin, specifically “a shed that lacks utilities.” (Note that some building codes do not allow accessory buildings to be constructed on sites that do not include a residence. However, my code does.) So, I applied for a building permit for a “10′ x 16′ shed” and that permit was issued without any problems. (Never just ignore the permit issue. Your municipality can issue whopping fines…usually several hundred dollars per day…and you could potentially have a problem selling your property.)

Continue reading

Framing

The framing of the cabin was straightforward. We used rough-sawn lumber and 3/4 inch plywood sheathing. I used a simple framing scheme with no headers above the windows and a single top plate on the walls. I used 3/4 inch plywood power nailed to the lumber with ring-shank nails to tie everything together into a strong and stiff wall system. I was confident that with this heavy sheathing, the minimal structure would be plenty strong.

Continue reading

Using Rough-Sawn Lumber

Dimensional lumber used in framing (i.e., 2×4, 2×6, etc.) is usually sold after planing and kiln drying. That’s why a 2×4 is actually 1.5″ x 3.5″. The stick of lumber from which that 2×4 was made was originally sawn to dimensions of 2″ x 4″. The length of these “rough sawn” boards is the nominal length plus at least 2 inches. So an 8′ 2×4 in rough-sawn form is 2″ x 4″ x 98+”.

You can buy rough-sawn lumber at most saw mills. Most of the time what you buy is “air dry” from stacks that have sat out in the mill’s yard for a year or so. The moisture content is still high, say 20%, but nothing like true green lumber right off the saw.

Continue reading

Cabin Cost Accounting

Here is what the Vermont Mini Cabin cost me:

Pressure-treated lumber (Home Depot) $100

Rough-sawn lumber (Eagle Saw Mill) $704

3/4″ plywood $568

Nails, screws, other misc. supplies $200

Tyvek $145

Ship-lap pine siding $600

Stain $100

Metal roofing panels and flashing (Fabral) $936

Clear pine for trim $180

Insulation $100

Steel door $100

Windows (12 Pella ProLine casements w/screens) $3623

Stove (Morso Squirrel) $1100

Chimney and stove pipe (Simpson) $500

Flooring (Forbo Marmoleum Click) $502

Cost before adjustments $9458

Adjustments:

Forgone BMW purchase ($44,260) …’cuz that’s what my friends are buying instead of doing stuff like this.

12 days labor of high-priced innovation consultant (not thinking about that)

Net Savings $34,802

Incidentally, I purchased the site for $8500, plus another $1000 or so in legal fees and transfer fees/taxes. (One of a half dozen lots I was able to aggregate in a largely defunct development.) So, even including the land costs, this project was well under half the cost of the BMW, and I believe it will be around a lot longer than that car would have been.

Incidentally, Dunn Lumber has an excellent site with prices listed for most lumber-yard items. This is a great reference for cost estimating, even though you most likely will not purchase from them unless you live in their service area.

Support Structure

One of my goals for this project was to tread lightly on the land.

The high spot of the site was a boulder maybe 16 ft. x 8 ft. and protruding 8 ft. above grade at one end. I decided that a nice approach would be to set the structure on the boulder. I reasoned that the boulder probably extended several feet below ground and was probably not going to move much over my lifetime.

Here I laid out the structure with some 2x4s to figure out how to orient it relative to the boulder. The boulder is covered with moss and lots of wet organic stuff as is typical of this part of Vermont.

I used an angle grinder (I’m quite happy with this Bosch model) and a diamond blade to cut some flat spots in the boulder for the  six points where I planned to support the structure. (So much for treading lightly some of you might observe…but these little cuts are nothing like blasting a big hole in the ground and pouring a foundation.)

Continue reading