Category Archives: cooking

Perfect Hard-Boiled Eggs

I haven’t posted in forever, but I was inspired this evening to just document what I have found to be the best approach for perfect hard-boiled eggs. What do I mean by perfect hardboiled eggs? Two things: (1) the yolk is cooked to the hardness I like, and (2) the shell peels off easily without that annoying sticking of egg white to the shell. (For the food nerds out there, my understanding, via an explanation I read in Cooks Illustrated, is that by dropping the eggs into boiling water you cause the membrane surrounding the egg white to bond to the shell allowing for easy peeling. Whereas if you bring cold eggs and water to a boil together, the membrane bonds to the egg white and the shell causing that annoying pocking of the egg white– or something like that.)

Total time from start to finish is about 20 minutes — with only about 2 minutes of actual work time, the rest waiting for water to boil and eggs to cook. We all should have a carton of HBs in the fridge all the time. No excuses not to.

perfect hard-boiled egg
I want my yolk just barely solid — just kicked over from soft in the middle.
easy to peel shell on hard-boiled egg
The shell can’t stick to the white — should peel easily.

Here’s what you do. Follow exactly. The only deviation that I have found to be discretionary is cooking time. If you prefer softer eggs, use less than 14 minutes. If you are cooking at high altitude, you’ll need longer.

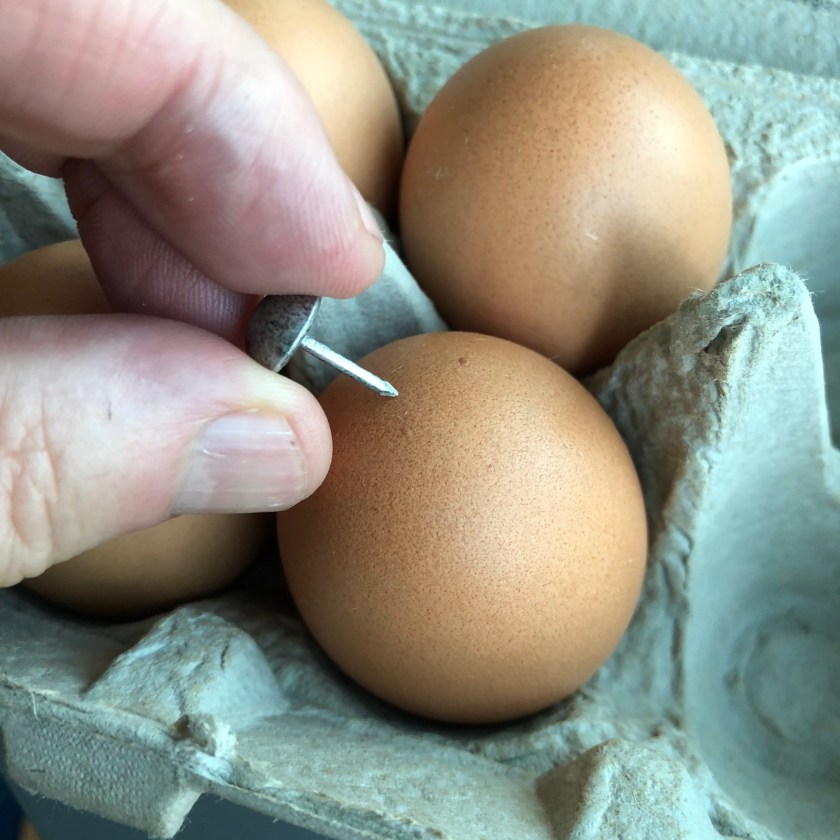
1. Prick the top of each egg with a fat tack while the eggs are in the carton. Make sure the tack goes all the way through the shell.

Prick the top of each egg.
Prick the top of each egg, while in the carton, with a fat tack. This is an upholstery tack.

2. Bring a saucepan of water to a boil. The water is about 2 inches (50mm) deep here. Must be at a boil.

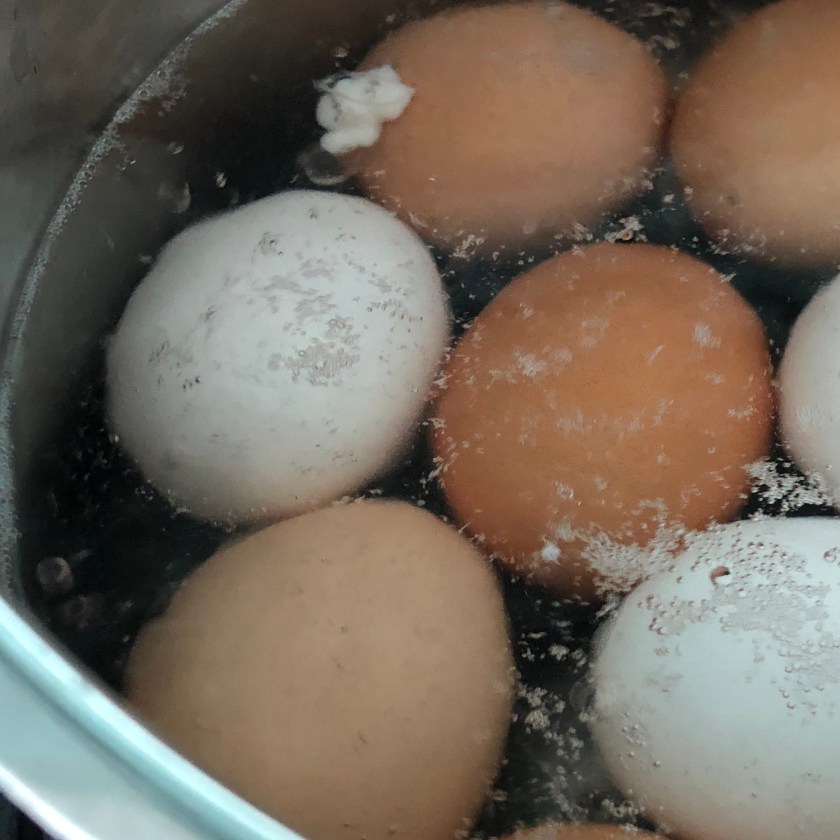
3. Using a pair of tongs, hold the egg vertically and slowly lower it into the water (maybe 3 seconds duration of immersion process). You’ll see in the second image that one egg has that annoying white eruption of egg white. I did that on purpose to demonstrate the importance of vertical immersion. If you drop the egg in with the hole down or to the side, the small air gap inside the egg shell will expand and extrude that egg white out the hole. That’s why you grab the egg with the tongs and lower it into the water over a period of about 3 seconds with the hole at the top. The air expansion happens nicely in this case, and you’ll see bubbles coming out of the hole and no egg white spilling out. It seems that as long as the air bubbles get started out the top it doesn’t matter if the egg then rolls over to the side.

using tongs to lower egg into boiling water
Use tongs to lower egg into boiling water, with hole pointing up.
egg white eruption
See the little egg white eruption? This only occurs if you drop the egg quickly on its side or upside down. Lower it slowly with the hole side up and the expanding air can escape without extruding the egg white.

4. After all eggs are immersed, start 14:00 minute timer. (This will end up averaging about 14:30 cook time, given the time required to lower the eggs into the water before you start the timer.) Note that this time will be invariant of the number of eggs so long as you have plenty of water and keep the heat high initially. The point is to keep the water at 212F/100C, in which case the cook time should not depend on the number of eggs you cook.

5. At 14 minutes, pour off most of the water and dump a big pile of ice into the pan.

6. Let the eggs cool for a few minutes. This allegedly further causes the membrane to do the right thing, but I think the more important effect is to stop the cooking process at a precise time. If you’re going to eat some eggs immediately and like them warm, I pull them after a couple of minutes so they are at perfect eating temperature. If I’ll be storing the eggs in the fridge, I let them chill.

Ice the eggs
Pour off most of the water and dump some ice on top.

7. Store or eat. (Cut the top off the egg carton and store the eggs that way — you won’t forget they are hard boiled eggs and you’ll be reminded you’ve got a nice inventory of nature’s perfect food ready to eat.)

store eggs in carton with lid cut off

You’ll get perfect eggs every time.

Sous Vide Cooking “as is” Vacuum-Packed Meat

I’m always looking for short cuts in cooking. I recently bought a Nomiku consumer sous-vide immersion heater. I have been pretty happy with the low-cost Ziploc-brand vacuum bags and manual pump. I don’t really see a compelling reason to buy a $150 vacuum sealer.

However, a lot of cuts of meat come already vacuum packed in a low-density polyethylene (LDPE) wrapper. Can you just cook the meat as-is in that wrapper as it comes from the store. That would sure make things easy. The short answer is yes. I have now done this a dozen or so times with skirt steak, flat-iron steak, and today with a leg of lamb (for Easter).

Continue reading

Baubilt Pizza

Once you’ve mastered Baubilt Bread…or really any of the various Bittman recipe variants, pizza is a snap.

I modify the bread dough slightly, using an 80 percent hydration dough (e.g., 80 grams water for every 100 grams flour). I usually mix 700 g flour and 560 g water, which gives me two nice big pizzas. Otherwise, I prepare the dough exactly as for bread.

Even at 80 percent, this dough is still much wetter than most pizza dough, so you can’t really roll it or toss it to form a flat shell. Rather, I press it with my fingers and hands to stretch it to fit a rectangular non-stick baking sheet. I use olive oil on the tray and I spread some olive oil on the top of the dough to prevent sticking to my hands, too. Since I like lots of olive oil on the pizza anyway, this is win-win.

Once the dough is spread (and good luck getting it to really stretch perfectly into the corners of the pan…you’re going to unavoidably end up with some rebound) I bake for 10-15 minutes at 450F. Then, I remove it from the oven, and apply tomatoes and toppings.

Update: I thought about how to avoid that pesky rebound of the dough in the pan. I tried putting mugs in each corner and baking this way for the first few minutes. Worked pretty well, but this may be a bit obsessive.

Update 2: Another method that is pretty effective is to apply some olive oil to a sheet of Saran wrap and then lay the wrap over the dough before pressing/stretching. This avoids the sticky hands problem and works quite well. You can apply and re-apply the wrap to different sections of the dough until you’re happy with the stretch.

For sauce, I simmer canned crushed tomatoes (Pomi, Furmano’s, Muir Glen, Tutto Rosso…any brand you like) with basil and garlic to remove some of the water (thus preventing soggy pizza). Of course, you can put whatever you want on a pizza. I like broccoli, onions, oil-cured olives, and fresh mozzarella.

Update: my method has now evolved to THREE baking steps…first, bake the dough until it is nearly done (10-15 minutes), then spread lots of tomato sauce and bake for another 5-10 minutes (this dehydrates the sauce somewhat, increasing its intensity and further minimizing the risk of soggy crust), and finally add toppings/cheese and bake until everything is nice and melted.

The dough should be chewy, crusty, and full of air pockets. Yum squared.

Basic Baubilt Bread

Many people have tried the outstanding no-knead bread recipe adapted from the Sullivan Street Bakery, published in the New York Times (at least twice) by Mark Bittman, and the subject of a lot of follow-up traffic on the internet.

I tried each version of the recipe as it became simpler. Bittman now claims 5 minutes of labor to make a loaf. I think I’ve got it down to half that. The crux move for me was discovering a teflon-coated ceramic baking dish that can serve as the single receptacle for the entire process, including mixing, rising, and baking. The dish I have is shown here along with the finished loaf. It’s available from Amazon for $39.99. (No, I’m not a shill for the manufacturer. Yes, I do get 80 cents if you buy one from Amazon.)

Baubilt Bread Recipe

  1. Place teflon-coated baking dish on a digital kitchen scale and press “tare” to zero scale.
  2. Add 600 g of flour to the dish.  (I dump some white flour in and then dump in some whole wheat flour, aiming for about 1/3 whole wheat, but I’m not fussy about it. Mix in 2 teaspoons salt and about 1 teaspoon dry yeast. (Folks, it doesn’t really matter how much yeast you use… 1/2 t to 1 T will work fine; the critters multiply like crazy.)
  3. Press “tare” again to zero scale.
  4. Add 540 g water. (The precise values don’t matter…what does matter is the ratio, that you add 90% as much water as flour by weight…a so-called 90 percent hydration dough….really wet by bread dough standards, which is why this recipe has such nice bubbles and doesn’t require kneading.)
  5. Mix the dough until it’s a uniform consistency (just a few strokes to get everything mixed thoroughly).

  • Let the dough rise in the covered dish for 5-10 hours, with 7-8 hours the ideal, depending on temperature. Mine rises at about 70F, the temperature in my kitchen.

  • Turn your oven on and set to 500F.  Stir the dough to “knock it down.” The dough will be pretty gooey. Wipe off the edges/sides of the dish to remove any dough residue so it doesn’t burn to a crisp in the oven. Put the lid back on and let the dough rest/rise while the oven preheats.

  • Put the covered dish in oven and turn the oven down to 450F.  Bake for 45 minutes. (The initial 500F jolt is to make up for skipping Bittman’s step of pre-heating the pan, etc.)
  • Remove the lid and bake for another 15 minutes (or until the internal temperature of the loaf, via an instant-read thermometer, 200F).
  • Turn the baked bread out on cooling rack. (It should fall right out of this pan.)
  • Using a Plain Old Pan

    Of course you can bake bread without a teflon-coated ceramic baking dish. Before getting my baking dish I used a plain old 6-quart dutch oven (a stainless and aluminum model from Sur La Table with metal handles). But, you’ll probably need to use a bowl for steps 1-7 and then flop the ball of dough into a well-oiled pan before baking. I’ve never tried using a plain metal pan from start to finish, but I’m guessing the bread will stick badly to the pan if you try that approach. You do need to use a pan with a good lid, although I suppose foil might work.

    Further notes:

    Yes, of course different flour types give different results. I use plain old U.S. all-purpose flour plus Trader Joe’s white whole wheat flour, but I’ve used all kinds with good results. The bread is sinful with 100 percent white flour. One third whole wheat provides a veneer of nutritional respectability without much compromise in yumminess.

    I use grams on the scale because the units feel nice and precise to me.  I realize I’m mixing imperial and metric units. Sue me. A digital scale is a good thing to have in a kitchen, but if you don’t have one, then measure out 5 cups of flour (about 625 g) and 19 oz. water (563 g, which is 90% of 625 g).

    An instant-read thermometer is better than timing the baking. Let the final (uncovered) phase go until the internal temperature of the bread is 200F.