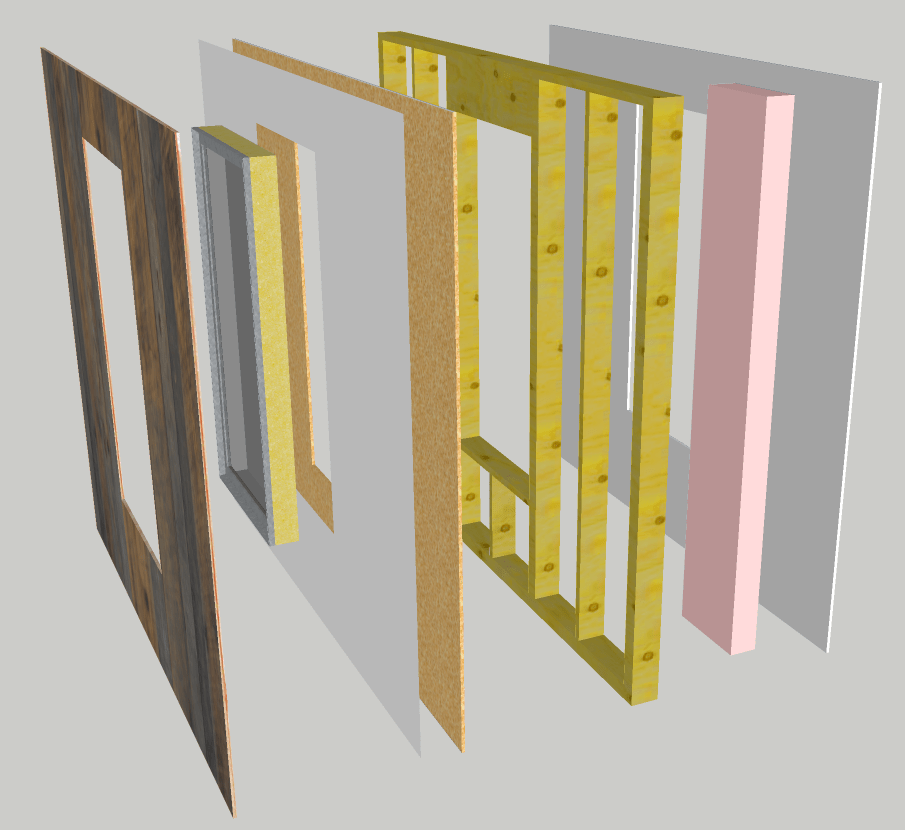
Many of us have a mental model of insulation as the nice fluffy stuff sandwiched between the inner and outer layers of our walls. The (thermally) ugly reality is that most walls contain lots of doors and windows, and that the wall area that is not doors and windows is full of wood and steel.
Here is a sketch (thanks to my newly acquired skills in Google Sketchup) of a typical section of wall for my Park City house.
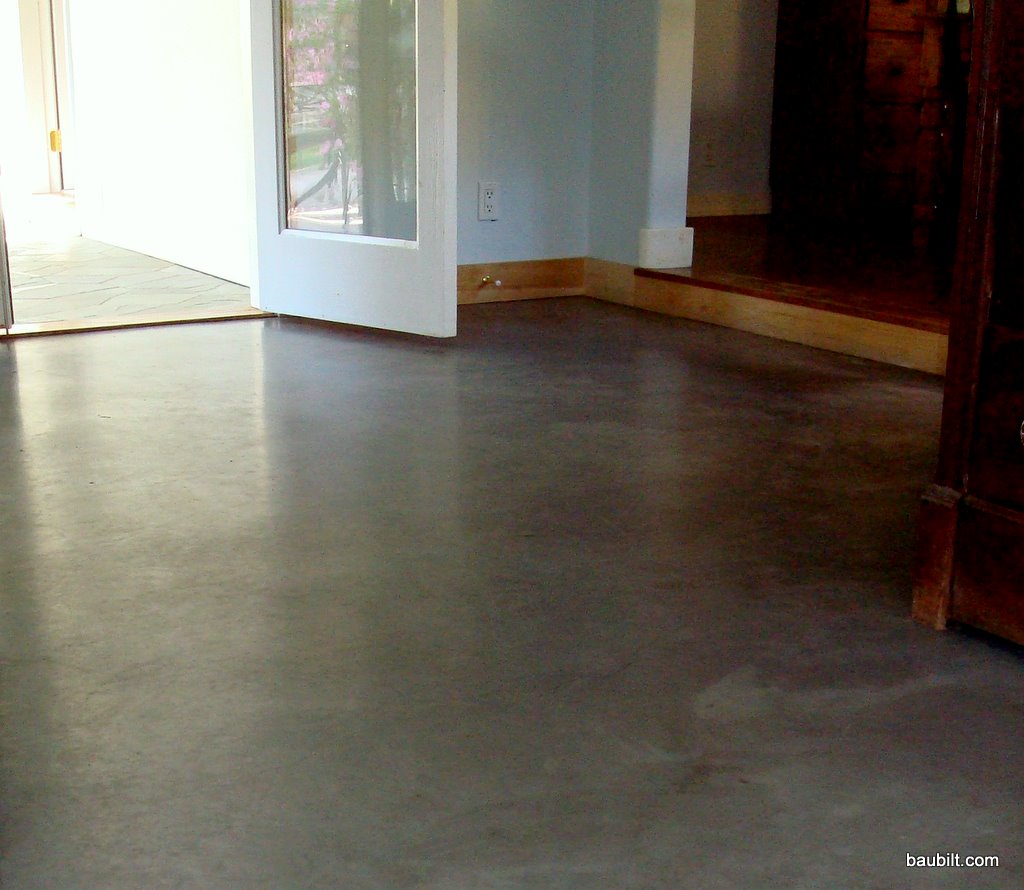
These are my notes on creating nice residential concrete floors. In my primary residence, I put in about 1500 sq-ft of concrete floors in the lower level. I used a 6-inch slab on crushed stone with 1/2 inch PEX tubing for hydronic heating. I’m pretty happy with these floors, although not wild about the results I got in finishing/sealing them. I am in the process of building a second home in which all three levels will have concrete floors. In principle concrete is (a) very inexpensive, (b) a wonderful means of installing hydronic heating, and (c) attractive. But, I’ve found that there is all kinds of confusing information about how to achieve these aims. Here is what I’ve learned based on experience, research, talking to concrete contractors, and my own experiments.
In this post I explain the analysis I did to understand energy efficiency design issues in my new house.
There are two basic contributors to the energy efficiency of a new house:
1. basic form, and
2. energy efficiency features.
By basic form, I mean what shape does the house have, how many stories is it, and how much window area is there. Those factors matter quite a lot. The most thermally efficient shape (ignoring solar factors) has very little surface area relative to its volume, basically a cube (if you assume the surfaces will be flat not curved). In the analysis I did, I assumed for a base case, a 3200 sq-ft 2-story house, with 8′ ceilings, on a 40′ x 40′ footprint. That’s a pretty boxy shape, but quite efficient thermally.
Windows are wonderful, except that they have just terrible thermal performance, even the really fancy ones. So, you basically have to decide how much glass you want and trade that off against how much energy you are willing to lose. About 12.5% of the wall area on an average new home in the U.S. is windows. I assumed that value in my base case.
OK, that boxy house with average windows in it will lose about 23,000 btu/hr keeping the inside at 70F on a 30F day, a typical heating day in climate zone 6, where I’m building my house. Note that this is not the maximum required heating capacity, which would actually be about 40,000 btu/hr for the -7F design temperature used to size boilers in zone 6. If you assume 200 days a year of 30F weather you get 8000 heating-degree-days, which is pretty close to the actual value for my location.
My Park City Modern site is at 7000 ft. altitude, is in climate zone 6, experiences 8196 heating-degree-days, and receives 340 inches of snow per year on average. Dealing with weather is a huge issue in designing for this site.
I will use natural gas as an energy source and wanted to minimize the use of that resource. As a result, I worked to build an energy efficient house that takes advantage of the winter sun. I also skipped the heated driveway, to my neighbors’ dismay.
My insulation plan is as follows:
Roof System
22 gauge cold-rolled corrugated roofing on
roofing felt with ice shield on the lowest 6′ of the roof on
ventilated nail base on
OSB decking on
Double 2×12 rafters 24 inches on center
Wall System
Foundation System
Flash and batt roof
Flash and batt walls
2″ XPS foam on outside of foundation walls
Fiberglass batts on interior of foundation walls
Some Comments
In order of priority, if you want to minimize heat loss, here is what you do:
Minimize windows
Minimize air infiltration
Minimize surface area
Maximize R-value
Minimize bridging through wood and steel structure
Everyone in the engineering world knows McMaster-Carr, but few people in the DIY world do. McMaster is a privately held company based in Illinois that may be the world’s largest engineering superstore. They have hundreds of thousands of items and in twenty plus years of using them I don’t think I’ve ever experienced a stock out. Remarkable.
They have everything. What do I mean by “everything”? Well, you can buy stainless steel spring wire, storage bins, a work bench, a belt sander, fasteners, and (literally) a kitchen sink.
You wouldn’t want to use McMaster for something you can get at Home Depot, even though they have almost everything Home Depot does, but they fit the bill when you need something a little bit out of the ordinary or you want to use an industrial/commercial product in your personal project.
Here are some nice items I’ve used them for in my projects:
Copper sheet.
John Boos “butcherblock” countertops (under “Maple tops”) at $16/sq-ft
Richlite lab bench material (the predecessor to the oh-so-trendy Paperstone…called “phenolic tops” at McMaster) at $26/sq-ft
Heavy-duty urethane casters to support a huge rolling shelving unit.
Acme threaded rod for shelf supports.
Any manner of weird drill bit or fastener.
“Speedrail” tubing fittings for railings, etc.
They take credit cards. They ship the same day by UPS.
My workbenches shown here (on the left) have McMaster tops (both butcher block and Richlite).
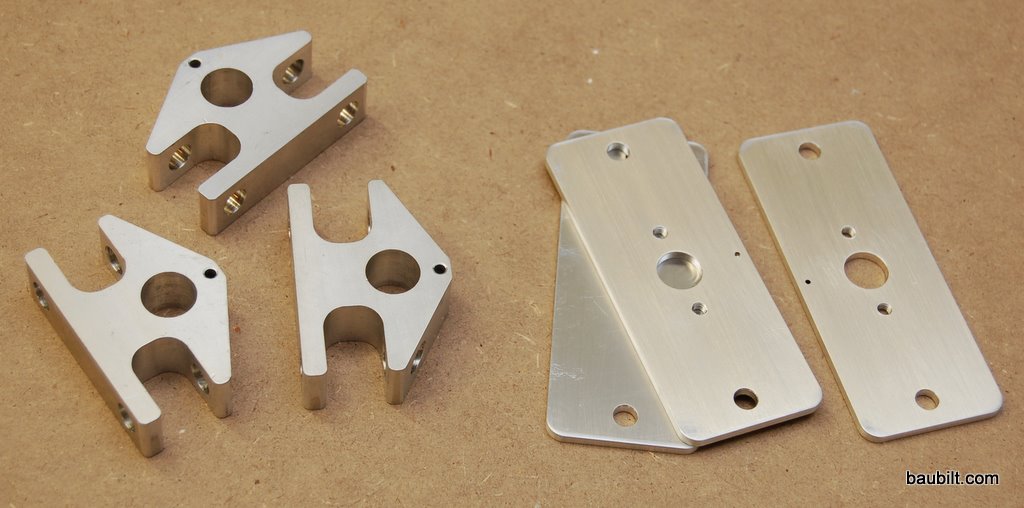
I described the Ponoko laser cutting service and the Misumi semi-custom parts service. As nice as those are, sometimes you just need to make something out of a chunk of aluminum with a good old fashioned machine tool. Of course you can try to remember how to do that yourself, or find a really handy friend who can do it for you. Most of the time, I use emachineshop.com.
Here are some parts I made using the eMachineshop service.
Here are the eMachineshop parts combined with the Ponoko parts and the Misumi parts to make the completed assembly.
Occasionally my expertise as an engineer carries over into the Baubilt world. Here is one such case. If you need to make fussy little shafts or brackets for some DIY project like a light fixture or a toilet paper holder, consider using the Misumi service. Misumi is a Japanese company that has a huge collection of semi-custom parts (hundreds of categories really) that are made to order using your uniquely specified parameters. For example, let’s say you need a stainless-steel rod 8mm in diameter and 96mm long for some perfect door pull you are designing. You can order that part from Misumi and it will be made to order on a computer-controlled machine tool (in Japan) and shipped directly to you…for remarkably short money.
Here are some parts I had made for use with the Ponoko parts described elsewhere. I think I had 10 sets made, and have already used 7 of the sets by now. My recollection is that these parts were $5-15 each, which is a screaming deal for a custom machined part. The trick of course is that these aren’t really custom; they are semi-custom parts that are made to order with your pre-specified dimensions.
In order to give one of the design review committees a better sense of what the house would look like on the site, I made a quick sketch in Adobe Photoshop and Illustrator.
Here it is. (As with most photos on Baubilt, click to see a larger version.)
To do this, you need some facility in a photo editing tool and an illustration tool. Here’s what I did. First, I found a photo of the site that was oriented such that the front elevation of the house would be in the plane of the image. I then pasted the photo into Illustrator. As a separate layer, I pasted into Illustrator a line drawing of the front elevation from the architects. I then drew rectangles for the windows and filled them in with a color picked from windows in a photo of a neighboring house. I inserted boards for siding (rectangles filled with colors picked from siding photos). I drew the roof in and filled it with colors picked from neighboring rusted metal roofs. Then, I copied the trees and car from the photo in Photoshop and pasted them in front of the house. Finally, I drew in a driveway freehand in Illustrator. I pasted some rocks and trees in for landscaping. All of this took about 2-3 hours. I’m fairly good with these tools, but I was not fussy about the sketch. I’m pretty happy with the resulting image, which has been useful in communicating how the house is likely to look on the site.
Once you’ve mastered Baubilt Bread…or really any of the various Bittman recipe variants, pizza is a snap.
I modify the bread dough slightly, using an 80 percent hydration dough (e.g., 80 grams water for every 100 grams flour). I usually mix 700 g flour and 560 g water, which gives me two nice big pizzas. Otherwise, I prepare the dough exactly as for bread.
Even at 80 percent, this dough is still much wetter than most pizza dough, so you can’t really roll it or toss it to form a flat shell. Rather, I press it with my fingers and hands to stretch it to fit a rectangular non-stick baking sheet. I use olive oil on the tray and I spread some olive oil on the top of the dough to prevent sticking to my hands, too. Since I like lots of olive oil on the pizza anyway, this is win-win.
Once the dough is spread (and good luck getting it to really stretch perfectly into the corners of the pan…you’re going to unavoidably end up with some rebound) I bake for 10-15 minutes at 450F. Then, I remove it from the oven, and apply tomatoes and toppings.
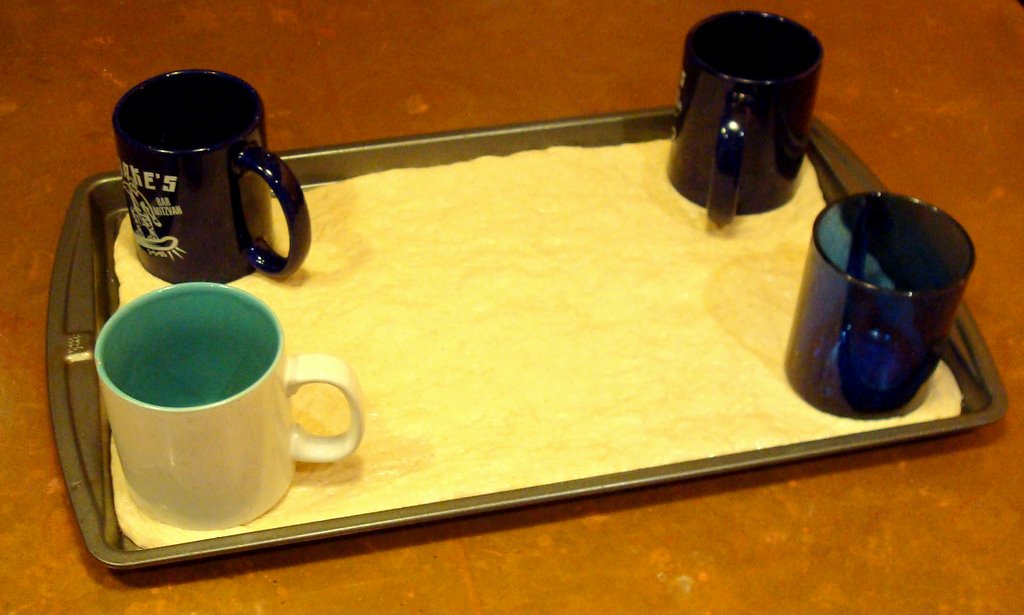
Update: I thought about how to avoid that pesky rebound of the dough in the pan. I tried putting mugs in each corner and baking this way for the first few minutes. Worked pretty well, but this may be a bit obsessive.
Update 2: Another method that is pretty effective is to apply some olive oil to a sheet of Saran wrap and then lay the wrap over the dough before pressing/stretching. This avoids the sticky hands problem and works quite well. You can apply and re-apply the wrap to different sections of the dough until you’re happy with the stretch.
For sauce, I simmer canned crushed tomatoes (Pomi, Furmano’s, Muir Glen, Tutto Rosso…any brand you like) with basil and garlic to remove some of the water (thus preventing soggy pizza). Of course, you can put whatever you want on a pizza. I like broccoli, onions, oil-cured olives, and fresh mozzarella.
Update: my method has now evolved to THREE baking steps…first, bake the dough until it is nearly done (10-15 minutes), then spread lots of tomato sauce and bake for another 5-10 minutes (this dehydrates the sauce somewhat, increasing its intensity and further minimizing the risk of soggy crust), and finally add toppings/cheese and bake until everything is nice and melted.
The dough should be chewy, crusty, and full of air pockets. Yum squared.
Dimensional lumber used in framing (i.e., 2×4, 2×6, etc.) is usually sold after planing and kiln drying. That’s why a 2×4 is actually 1.5″ x 3.5″. The stick of lumber from which that 2×4 was made was originally sawn to dimensions of 2″ x 4″. The length of these “rough sawn” boards is the nominal length plus at least 2 inches. So an 8′ 2×4 in rough-sawn form is 2″ x 4″ x 98+”.
You can buy rough-sawn lumber at most saw mills. Most of the time what you buy is “air dry” from stacks that have sat out in the mill’s yard for a year or so. The moisture content is still high, say 20%, but nothing like true green lumber right off the saw.