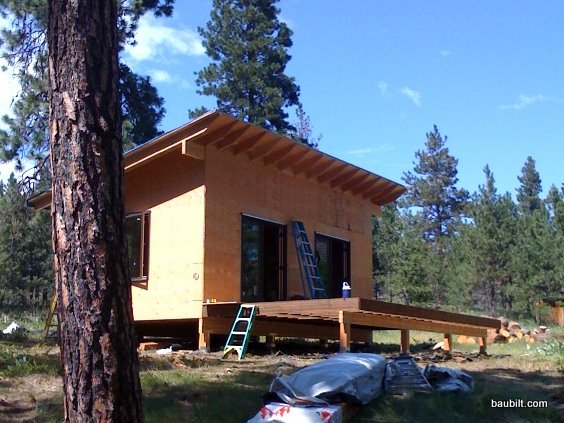
Following are some progress photos shot by my father-in-law Joe on site this week. There is undeniable magic in seeing a structure materialize. The magic is accentuated by having been 2500 miles away for the entire process and only seeing a fairly significant intermediate product (as shown in the photo). Of course there is also some remorse (yikes…is there enough glass on the front facade…), but still, it’s pretty fun to see ones design appear.
BTW, the builder Jim Burrowes is really good. There are “framers” and then there are Montana builders who happen to do framing because it is part of the job. Jim does nice crisp framing (along with wiring, plumbing, finish carpentry, and more…).
In stark contrast to the materials I used in the Vermont Mini-Cabin, much of the structure of the Park City Modern house is engineered lumber. The entire floor system is framed from “I-Joists,” or “TJIs” as they are called informally. (The I-Joist was pioneered by the brand TrusJoist Inc., thus the acronym TJI, I think.) The brand is now called iLevel, and is a division of Weyerhauser. Other companies make similar product. The main floor system with the TJIs in place is shown in this photo.
I met on site this weekend with my father-in-law Joe and our builder Jim. We staked out the pavilion so Jim can get started. Our basic approach was to site the structure so that the deck has perfect views of the lake and the Mission Mountains. That happens to give us a southeast exposure, which is perfect. We’ll have warm sun in the morning, and hopefully a bit of shade in the late afternoon, when it can get really hot.
Framing is a blast, because framers are fast and progress is obvious. My framer is Jose Magana (Magana Construction), who has framed a couple of houses for my “general coordinator” Steve Kotsenburg (more on that arrangement in another post).
Jose is a hands-on guy and works alongside his crew, which is one of the reasons I chose him. I like being able to deal directly with the person doing the work. The first day, they got the walls laid out and quite a bit of the perimeter put up. Framing will get fussy and slow when they have to put the steel columns and beams in upstairs next week, and when they get to the roof system, which is really tricky. But, for now, the structure is going up fast and furious.
The flatwork guy (Gough Concrete) poured the lower-level slab on Thursday and saw-cut the control joints on Friday. I stopped by on Saturday to take a look. We used a 2% mix of Solomon liquid color, which they call “smoke.” It’s just right. The tint is significantly darker than natural concrete, but still comes across as gray, not black. This color in this concentration costs $39 per cubic yard of concrete. Given that the mud itself only costs $110 per yard, that’s pretty significant. However, given that for this I get a finished floor, I consider the tinted concrete a bargain. This floor cost $5.40 per square foot for everything (#4 rebar, pump truck, concrete, tinting, placing the concrete, finishing the concrete, coating with an acrylic sealer, and saw cuts). This did not include the 15 mil vapor barrier and the under-slab insulation, which my plumbing and heating guy did.
The slab ended up being 6 inches thick instead of 5 inches (meaning the gravel was a bit low), which cost an extra $270 for another 2.5 yards of concrete. The control joints are basically on the same grid as the rooms, stairwell, and passageways, although I split the larger rooms in half so that the joints are not more than about 10 feet apart. (Control joints are created by sawing a 3/4 inch deep groove in the concrete. This gives some visual definition to the space and encourages the concrete to crack on the lines instead of diagonally across the room. (That sort of works…but avoiding cracks altogether is a fool’s errand.)
This week we got the foundation installed, the damp-proofing and insulation in place, the footing drains installed, and the sub-slab rough plumbing placed. We’re now ready for the lower-level slab to be poured (with the hydronic tubing for heat installed within the slab).
Here are the photos of the foundation and related steps.
Footings are the roughly one-foot thick slabs of concrete on which the foundation walls of the house rest. They are designed to be large enough to distribute the weight of the house onto the excavated soil surface such that the soil does not collapse from the load. As a practical matter they tend to be 20-72 inches wide depending on what part of the house they support. They usually need to be 24-48 inches below the ground surface (depending on region) to be below the frost line.
Placing the footings is a pretty remarkable thing to watch. A crew of 8 (Stone Construction) arrived at 7am and they left around 6pm. With another two hours of work the next morning to strip the forms and pack up, I had completed footings.
This not a fussy construction task. They take a trailer full of lumber and hammer it together in the rough shape they’re after. They pump the forms full of concrete, and then trowel the top surface to a snapped line, which defines the top surface of the footing. The foundation walls are then built on top of these troweled surfaces. The photos tell the story.
I have finished concrete floors in my lower level. I like them quite a lot. However, the area under my chair at my desk had developed some spalling. The spalling is a crumbling of the top surface of the concrete. I believe this is caused by a failure of the surface layer, which is comprised of the concrete “fines” which float to the top during troweling. I suspect that some gritty material gets on the caster of the office chair and with repeated rolling causes some little compression cracks, which then spread. The spalling was not deep, but I suspected it would get worse if I did not deal with it.
I made a trip to the site to watch the excavator break ground. This was April 28. The site was staked and ready to go. Here is the site on the eve of ground breaking.